
Get a Perfect At-Home Manicure in 7 Easy Steps
DIY Iridescent Glitter Nail Polish
Home Manicure is an essential part of every woman’s beauty routine. It gives your hands a beautiful shine and makes them look healthy and clean. However, if you’re looking for a quick and easy way to get a perfect manicure at home, then you’ve come to the right place. In this article, we’ll show you how to do it yourself with just seven simple steps!
I’m going to teach you how to get a perfect manicurist at home in seven easy steps. So let’s start!
Step 1: Prep Your Hands
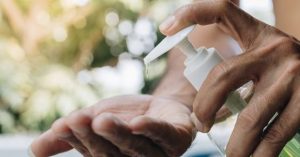
The first step to getting a great manicure is preparing your hands properly. You need to make sure that they are completely dry before applying any polish or gel nail polish remover. If there are still some traces of moisture on your nails, it will affect the final result.
To do this, simply use warm water with a little bit of soap. Make sure not to scrub too hard as this can damage your cuticles. After washing your hands thoroughly, pat them dry using a towel. This should take about 5 minutes.
If you have sensitive skin, I recommend using baby oil instead of regular hand lotion. Baby oils contain natural ingredients which help moisturize your hands without leaving behind a greasy residue.
You may also want to apply a small amount of Vaseline onto your fingertips prior to starting the process. The Vaseline helps prevent chipping when removing the topcoat from your nails. Once your hands are prepared, you’ll be ready to move on to Step 2.
Step 2: Apply Gel Nail Polish Remover
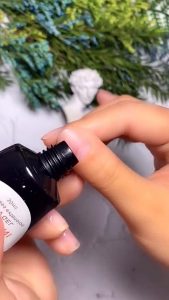
Gel nail polish removers work by dissolving away all the old polish while keeping the new one intact. They usually consist of acetone mixed with alcohols like ethanol or butanol. These solvents remove both acrylic and traditional nail polishes.
There are two types of gel nail polish removers available – ones that require heat and others that don’t. For most people, heating up their gel nail polish remover isn’t necessary because these products already dissolve off the old polish. But if you prefer to use heated gel nail polish remover, here’s what you need to know.
First, pour out half of the bottle into a bowl. Then add hot tap water until the mixture reaches room temperature. Next, mix well so that no lumps remain. Finally, stir again just enough to combine everything together.
Once you’ve got the correct consistency, dip each fingertip into the solution and gently rub back and forth across the surface of the nail. Be careful not to press down too much since this could cause the polish underneath to lift off. Repeat this procedure for all 10 fingers.
Afterward, rinse your hands under running cold water. Pat them dry using a soft cloth. Now you’re ready to move on to the next step.
Step 3: Remove Top Coat Using Acetone & Alcohol
Acetone is another popular solvent used to remove topcoats. Unlike gel nail polish removers, acetone doesn’t require heat. Instead, it works best at low temperatures. To remove the topcoat, follow the same instructions above except replace the gel nail polish remover with acetone.
When using acetone, always wear gloves to protect yourself against its strong fumes. It’s important to note that acetone has an extremely high flashpoint. So even though it won’t burn you directly, it can irritate your eyes and nose. That said, once you get past those initial symptoms, you shouldn’t experience any discomfort.
When using acetone, start by pouring out half of the container into a separate bowl. Add hot tap water until the liquid reaches room temperature. Mix well so that no lump remains. Stir again just enough to combine things together. Dip each fingertip into the mixture and then massage it over the entire nail surface. You should repeat this process for every single nail. Afterward, wash your hands thoroughly with soap and warm water. This will ensure that there aren’t any traces left behind.
Finally, pat your hands dry using a clean towel. If you’d rather avoid using acetone altogether, try replacing it with rubbing alcohol. Just make sure to keep the amount consistent throughout. Otherwise, you’ll end up removing more than just the topcoat.
Step 4: Clean Your Cuticles With A Cotton Swab
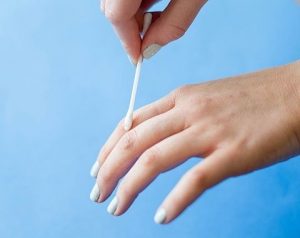
Cotton swabs come in handy when cleaning around cuticle edges. Simply insert the cotton ball between your nails and pull upward. The friction from pulling the cotton through your skin helps loosen dirt trapped beneath the nail plate. Once done, wipe the area clean with a tissue. If you have sensitive or damaged skin, be extra cautious when handling cotton balls. They may contain chemicals like formaldehyde which can damage your skin. Also, never reuse cotton swabs as they tend to lose some of their effectiveness after repeated usage.
Step 5: Polish On!
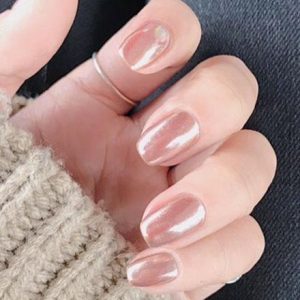
Now that your nails look great, it’s time to apply a new layer of color. Start by applying one thin coat of basecoat followed by three thinner layers of colors. Make sure to let each layer completely dry before adding the next. When painting your nails, use short strokes along the length of the nail. Avoid making long sweeping motions. Doing so might leave streaks. And if you want to add glitter, wait till the very last minute. Glitter tends to settle towards the bottom of the bottle. As such, you need to shake the bottle vigorously prior to application.
If you prefer matte finishes instead of shiny ones, simply skip the basecoat entirely. But remember that doing so means you’re not protected against chipping.
Step 6: Seal In Protection
Once all four fingers are painted, move on to the thumb. Use two coats of clear topcoats to seal everything in place. Be careful not to rub too hard since you don’t want to scratch off the finish. Letting the paint sit overnight also allows it to fully cure.
Step 7: Get Ready For Summertime Fun
If you’ve been following our guide step-by-step, you now know how to give your manicures a perfect summery touch. All you need is a few accessories to complete the look. Here we present five must-have items that will help you achieve flawless results at home.
1) Nail File – To remove excess polish without damaging the natural shape of your nails, invest in a quality file. There are many different types available online. Some files work better than others depending on what type of material they’re made of. However, regardless of brand, always test them first on an inconspicuous spot of your own fingernails.
2) Acetone – We mentioned earlier that acetone comes in handy when cleaning away stubborn stains. It works best when used alongside a cotton pad soaked in hot water. Soak the cotton pad in acetone while holding onto the other side. Then gently dab the stained part of your nail. Repeat this process several times until the stain disappears.
3) Scissors – Cuttingicles are small scissors specifically designed for trimming acrylic tips. You’ll find these tools sold separately or together with sets containing various sizes. Choose the right size based on the thickness of your acrylics.
4) Cuticle Oil – This oil protects your cuticles from drying out during those hot days spent outside. Apply it directly over your hands using your fingertips. Leave it there for about 10 minutes then rinse thoroughly under warm running water.
5) Gel Top Coat – A final layer of protection helps prevent chips and cracks caused by everyday wear and tear. The gel formula provides extra shine as well as UV resistance. Simply apply a single thick coat and allow it to dry naturally.
12 Best Dip Powder Nail Kits to Get a Salon-Quality Manicure at Home

A flawless finish you can achieve at home.
amazon/kiss manicures can save you a lot of money, but regular nail polish chips within days of application. That’s why brands have started to sell at-home gel kits that promise long-lasting salon-quality manicures for a fraction of the price.
Gel polish kits have taken over the market, but now there is a new-ish (maybe even better) at-home manicure method: dip powder nail kits.
What is a dip powder manicure? It’s a long-lasting manicure that doesn’t use UV light to harden. The color comes from dipping your nails into a pigmented powder, rather than painting on streaks of liquid. The result is a flawless, even coat, usually only achieved by professionals until now.
Are powder-dipped nails better than gel?
What is a dip powder manicure? The answer depends on what kind of look you want and how much time you’re willing to spend. Gel polishes are easier to apply because they don’t require any mixing or waiting around while the formula sets up. But if you prefer a more natural-looking mani, then it might be worth spending an extra $10-$20 per kit just so you get the full effect.
How do you apply dip powder nail polish at home?
What is a dip powder manicure? Dip powder nail polishes are applied using an applicator brush similar to those used for applying makeup. You start off by coating all four fingers and then work down each finger individually. Once you’ve finished one hand, move on to the other.
You’ll need two things to get started: A bottle of dip powder nail polish and an applicator brush. We recommend starting out with our best-selling dip powder kit because it includes everything you need to create professional results. The first step is to mix the powder with some rubbing alcohol. Make sure to shake vigorously before adding the mixture to the bottle. If you add too little alcohol, the product will not spread evenly across the surface of your nails. Too much alcohol could cause staining.
Next, take the brush and dip it into the solution. Gently swirl the brush back and forth to remove excess powder. Now place the tip of the brush against your index finger and press firmly.
Are dip powder nails safe?
If you are worried about your nail health, don’t fret: dip powder won’t ruin your nails but scraping and picking the manicure off will. Chipping away at your nails with a nail stick removes layers of your natural bed, weakening your nails.
remove dip powder nail polish, stick to the same removal process as a gel: dip a cotton pad in acetone and allow it to sit on your nails for 10 to 15 minutes before wiping the color away. If your manicure doesn’t budge after 15 minutes, let your nails soak in polish remover a bit longer. Don’t forget to add a moisturizer to your nails when you are all done!
To get you started, we’ve rounded up the best dip powder nail kits for an at-home salon-quality manicure that can last several weeks:
See also
The Best Nail Polish Kits For Your Home | Top 8 Products To Try Today
- OPI – “Dip Powder” Kit: This set contains six bottles of dip powder nail polish in five shades. Each bottle has enough powder to paint both hands and feet. It also comes with an applicator brush designed specifically for this type of polish.
- Essie – “Nails Inc.” Set: This set features eight bottles of dip powder nail lacquer in seven shades. Like its competitor’s version, it offers enough polish to coat both hands and feet. However, it does not have an applicator brush included. Instead, users must use their own brushes.
- Sally Hansen – “Powder Puff” Set: This set includes nine bottles of dip powder nail varnish in eight colors. Users should expect to find enough polish to cover both hands and feet. Unfortunately, there isn’t an applicator brush included either.
- Revlon – “Revlon Colorstay” Set: This set consists of 12 bottles of dip powder nail enamel in 11 different hues. There is enough polish to coat both your hands and feet. In addition, it comes with an applicator tool.
- Wet n Wild – “Wet ‘n’ Wild Dip Powder” Set: This set contains four bottles of dip powder nail polishes in three shades. You may be able to find more than one shade if you look around online or visit local beauty supply stores.
- L’Oreal Paris – “Loreal Professional” Set: This set includes 14 bottles of dip powder nail paints in 13 different shades. It also comes with a special brush made especially for applying these types of products.
- Maybelline New York – “Color Show” Set: This package contains 16 bottles of dip powder nail paint in 15 different shades. It also includes an applicator brush.
- Orly – “Orly Gel Envy” Set: This collection includes 18 bottles of dip powder nail color in 17 different shades. It also provides an applicator brush.


